mlfow Document: https://mlflow.org/docs/latest/index.html
mlfow git repo: https://github.com/mlflow/mlflow.git
MLOps는 왜 해야할까?
"연구실 밖으로 나온 모델"
참고: https://www.youtube.com/watch?v=DRIEKB9smBY&t=4624s
Step1. 다른 사람들이 모델을 사용할 수 있게 하고 싶어 ⇒ API를 이용하자!
- tensorflow serving with API 테스트했던 이전 블로그 글: Tensorflow serving(Rest API) with Docker
- pytorch 모델 serving 테스트했던 이전 블로그 글: Custom Model TorchServing 성공기
Step2. 이용자가 많아져서 로드 밸런스, 노드 스케일링이 필요하네? ⇒ Software Engineer 에게 Help하자!
Step3. ML 프로젝트에서 Data Scientist 와 Software Engineer의 목표가 다를 수 있다!
- Data Scientist: 다양한 실험을 통해 더 좋은 성능을 가진 모델을 개발 및 데이터 분석하는 것이 목표
- Software Engineer: 안정적이고 확장 가능한 시스템을 구축하고 유지 관리, 성능 최적화하는 것이 목표
⇒ MLOps 를 사용하자! 데이터 사이언티스트와 소프트웨어 엔지니어에게 협업 환경을 제공하여 실험 추적, 모델 관리 등 머신러닝의 수명 주기 및 운영을 간단하게 수행할 수 있게 해준다.
MLflow란?
참고: https://www.databricks.com/kr/product/managed-mlflow
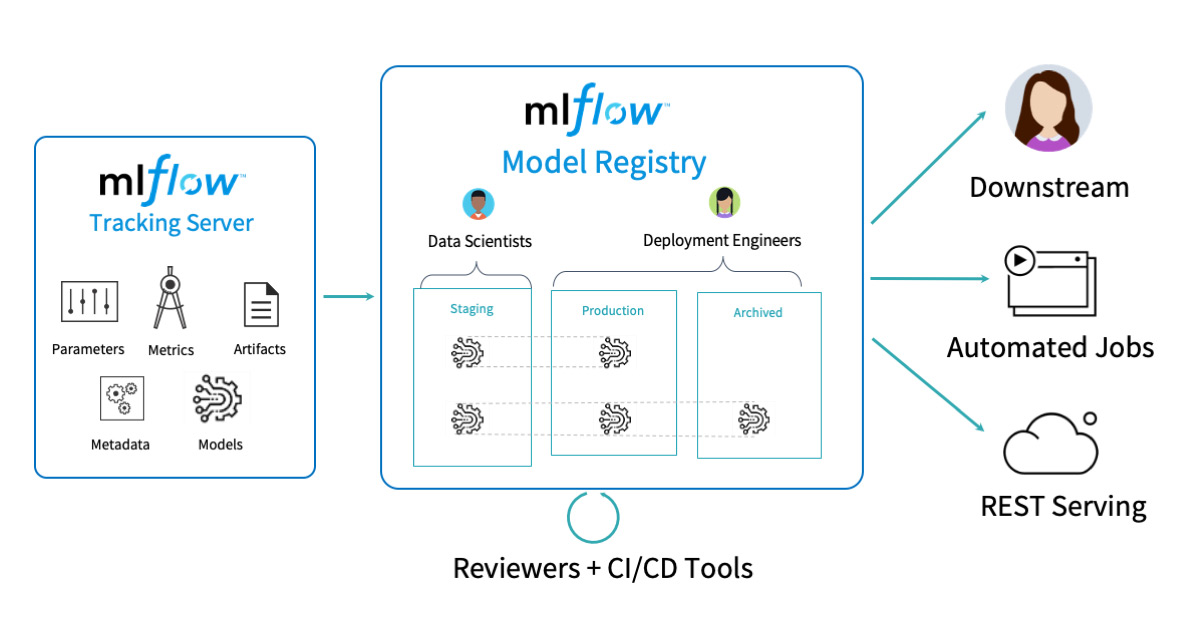
- MLflow Tracking: 실험에서 사용된 데이터를 기록하고 조회할 수 있다. (UI 제공)
- 저장 가능한 데이터: parameters, code version, metrics, model environments dependencies, model artifacts(ex, image, parquet files)
- Tags: 실험에 임의의 tag를 달아 필터를 걸어 찾아볼 수 있다.
- MLflow Models: 다양한 ML 라이브러리로 훈련된 모델을 패키징하기 위한 표준 형식
- Flavor: 모델 아티팩트를 저장하고 로드하기 위한 표준 형식⇒ 라이브러리에 관계없이 동일한 인터페이스를 통해서 모델 로드할 수 있다.
- ex) “python_function” Flaver는 python 함수로 모델을 저장하고 로드할 때 사용됨
- tensorflow와 pytorch 모델 coversion test를 했던 이전 블로그 글 (어려웠던 경험)
- MLflow Model Registry: 중앙 모델 저장소
- 참고: versioning, stage transitions, annotations와 같은 metadata도 포함하여 저장
- MLflow Projects: 코드를 실행하는데 사용되는 Environment를 지정할 수 있다. (conda, docker 컨테이너 등)
- MLflow Recipes
MLflow 어떻게 사용할까?
MLFlow로 모델 Lifecycle 관리
아래 작성한 예시 Code (API vs MLflow) : https://github.com/jaxgxxnxee/Mlflow-test/tree/master
Docker Compose 튜토리얼
도커란 : 컨테이너를 쉽고 빠르게 배포/확장하고 관리를 자동화해주는 오픈소스 플랫폼 컨테이너: 컨테이너는 격리된 공간에서 프로세스가 동작하는 기술. VM과 유사하지만 격리 속성을 완화하
everyday-deeplearning.tistory.com
0. Install MLflow
$ pip instatll mlflow
$ mlflow server \
    --host 0.0.0.0 \
    --port 5000
1. 프로젝트 생성하기 (iris_model Folder)
프로젝트 환경 정의
: conda, pyenv, docker 가능
MLproject : 프로젝트 정의서
name: sklearn_iris_example

conda_env: conda.yaml

entry_points:
  main:
    parameters:
      random_state: {type: int, default: 0}  # 여기서 param을 조절하면서 테스트함
    command: "python iris_model.py {random_state}"
conda.yaml: conda환경을 사용하기 위해 miniconda 먼저 설치 해야함
name: sklearn_iris_example

channels:
  - defaults

dependencies:
  - python=3.7
  - numpy
  - pandas
  - scikit-learn
  - pip
  - pip:
- mlflow모델 parmeter, metric 등 기록 대상 정의
iris_model.py
import mlflow
from mlflow.models.signature import infer_signature

from sklearn import datasets
from sklearn.model_selection import train_test_split
from sklearn.linear_model import LogisticRegression
from sklearn.metrics import accuracy_score, recall_score, precision_score, f1_score
import json
import sys

## Load Dataset
random_state = int(sys.argv[1]) if len(sys.argv) > 1 else 0
iris_data = datasets.load_iris()
target_index = {i: target for i, target in enumerate(iris_data['target_names'])}
X, y = iris_data.data, iris_data.target
X_train, X_test, y_train, y_test = train_test_split(X, y, test_size=0.2, random_state=random_state)

## Train Dataset
clf = LogisticRegression(max_iter=10000)  # api생성시는 문제가 없었지만, 여기서는 max_iter를 늘리지 않으면 에러가 남
clf.fit(X_train, y_train)
y_predict = clf.predict(X_test)

## Logging
mlflow.log_param("random_state", random_state)

mlflow.log_metric("ac_sc", accuracy_score(y_test, y_predict))
mlflow.log_metric("rc_sc", recall_score(y_test, y_predict, average="weighted"))
mlflow.log_metric("pr_sc", precision_score(y_test, y_predict, average="weighted"))
mlflow.log_metric("f1_sc", f1_score(y_test, y_predict, average='micro'))

signature = infer_signature(X_test, y_predict)  # 꼭 해야하는 것은 아닌듯?
mlflow.sklearn.log_model(clf, "iris_classification", signature=signature)

with open('../s3/target_index.json', 'w') as f:  # 실제 s3는 api_key, password 환경설정 해야함, 여기서는 local에서 접근할 수 있는 공유폴더에 저장함
    json.dump(target_index, f)
2. 모델 실행하기
$ mlflow run iris_model** issue: sklearn package관련 data memory 에러가 있었다 → 한 번 더 실행하니 되더라 (깔끔한 방법 다시 찾아봐야할듯)

- 참고: github에 올려둔 소스 바로 실행 가능하다고 함
$ mlflow run git@github.com:/{iris_model_path}.git
3. 훈련된 모델 Tracking하기
$ mlflow ui
4. 모델 배포하기
$ mlflow models serve -m src/iris_model/mlruns/0/14b6f49e06ec4f029b87dbeeb7c36daf/artifacts/iris_classification -p 5001 -h 0.0.0.0 # host의 default는 127.0.0.1 이지만 다른 곳에서 접근하기 위해 0.0.0.0으로 변경함- default flavor: python_function
5. 모델 호출
- **참고: pandas split을 꼭 사용해야 함
$ curl -X POST -H "Content-Type:application/json; format=pandas-split" --data '[{"columns": ["sepal length (cm)", "sepal width (cm)", "petal length (cm)", "petal width (cm)"], "data": [[5.1, 3.5, 1.4, 0.2]]}]' http://0.0.0.0:5002/invocations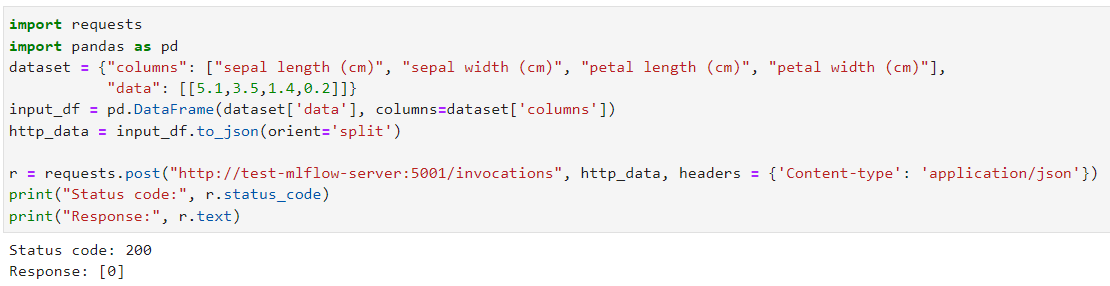
Todo
- 모델 Tracking options
- backend-store-url: setting 안하면 ui에서 models를 확인할 수 없음
- https://mlflow.org/docs/latest/tracking.html
- Tags
- UI visualization
- 모델 배포
- custom predict function
- serve with Cloud service
- https://www.databricks.com/product/managed-mlflow
활용 사례
'PYTHON으로 딥러닝하기' 카테고리의 다른 글
| Python으로 딥러닝하기|자연어 3. Seq2Seq, Attention (0) | 2024.01.23 |
|---|---|
| Python 더 나아가기 | 실수하기 쉬운 Python 문법 & type hits (0) | 2022.08.03 |
| Custom Model TorchServing 성공기 (0) | 2022.07.14 |
| Model Conversion between Tensorflow and Pytorch | From TF To Torch (0) | 2022.07.12 |
| Model Conversion between Tensorflow and Pytorch (0) | 2022.07.05 |


