반응형

Python으로 딥러닝하기|자연어 처리 1. 토크나이징

Python으로 딥러닝하기|자연어 2. 단어 임베딩, Word2Vec

Python으로 딥러닝하기|RNN(Recurrent Neural Networks) Part1. 이론

Python으로 딥러닝하기|LSTM(RNN) Part1&2. 이론 및 실습


잠시 미뤄왔던 자연어처리 시리즈를 다시 작성해보고자 합니다... 화이팅!


seq2seq paper: Sequence to Sequence Learning with Neural Networks


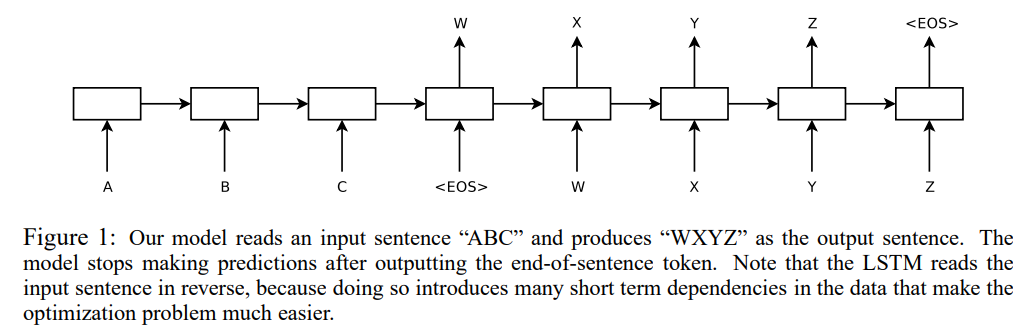
우선 Sequence to Sequence(Seq2Seq) 모델은 RNN의 many-to-many 와 유사한 구조로 시퀀스 형태의 입력값을 넣으면 시퀀스 형태의 출력값을 내놓는 구조입니다. 따라서 번역, 요약, 챗봇 등 다양한 분야에서 활용될 수 있습니다.


RNN(LSTM) 모델을 기반으로 Encoder와 Decoder 부분이 나눠져 있습니다. Encoder에서는 입력값의 context vector(=hidden status)를 생성하고 Decoder에서는 해당 vector를 활용해 재귀적으로 출력값을 만들어내는 구조입니다.

그리고 Encoder와 Decoder는 길이가 고정되어있지만, 각각 다른 최대 길이를 가질 수 있고, 데이터의 길이가 적으면 Padding으로 채웁니다.

Seq2Seq: Encoder-Decoder


RNN의 many-to-many 와 유사한 구조라고 이야기했는데, Decoder에서 다른 부분이 존재합니다.


우선 Seq2Seq 구조의 경우 <EOS> 혹은 <START>, <END> 라는 토큰을 활용하여 시작과 끝맺음을 할 수 있도록 데이터를 구성하여 훈련할 수 있습니다. (참고: 최대 길이보다 길이가 짧은 경우 <END> 토큰 이후에 Padding으로 채우는 방식)


또한 "재귀적"으로 훈련된다는 점도 다릅니다. Decoder의 현재 cell(층)의 input은 이전 cell의 output을 활용하는 것으로 구성되어 있습니다. (RNN은 context vector 하나만 사용)

여기서 만약 Decoder가 시작부터 틀린다면 학습이 잘 되지 않을 수 있습니다. 따라서 Decoder의 현재 cell의 input 값을 실제(정답) 데이터로 사용하는 Teacher Forcing이라는 새로운 학습 방법이 제안됩니다.


Transformer paper: Attention Is All You Need


이후에 Transformer를 설명할 것인데, 이를 이해하기 위해서는 논문의 제목에서도 알 수 있듯, Attention이라는 개념을 먼저 알아야합니다.


Attention 매커니즘은 고정된 크기의 context vector를 사용하는 Seq2Seq를 개선하는 방법으로 아래의 그림을 참고해서 보면 Attention의 뜻을 짐작해 볼 수 있습니다.

1. Encoder에서 모든 cell(층)의 hidden status와 Decoder의 현재 cell의 hidden satus와 dot product를 하여 attention scores를 생성

2. softmax에 통과시켜 가중합을 한 attention value를 구하고 Decoder에서 현재 cell의 output 값과 concatenate하여 다음 값을 예측

이러한 과정을 통해 Encoder 부분의 어떤 hidden status에 더 "집중"하면 좋은지를 학습할 수 있습니다.

출처: https://wikidocs.net/22893


Attention 식은 매우 간단합니다. 아래의 식은 Scaled Dot-Product Attention Score입니다.

$\text{attention score}(s_t, h_i) = \frac{s_t^Th_i}{\sqrt{n}}$

$s_t$: Decoder의 현재 hidden status

$h_i$: Encoder의 i번째 hidden status


Transformer도 할 내용이 많아서.. 다시 돌아오겠습니다.


반응형
반응형

mlfow Document: https://mlflow.org/docs/latest/index.html

mlfow git repo: https://github.com/mlflow/mlflow.git


MLOps는 왜 해야할까?


"연구실 밖으로 나온 모델"

참고: https://www.youtube.com/watch?v=DRIEKB9smBY&t=4624s

Step1. 다른 사람들이 모델을 사용할 수 있게 하고 싶어 ⇒ API를 이용하자!

Step2. 이용자가 많아져서 로드 밸런스, 노드 스케일링이 필요하네? ⇒ Software Engineer 에게 Help하자!

Step3. ML 프로젝트에서 Data Scientist 와 Software Engineer의 목표가 다를 수 있다!

  • Data Scientist: 다양한 실험을 통해 더 좋은 성능을 가진 모델을 개발 및 데이터 분석하는 것이 목표
  • Software Engineer: 안정적이고 확장 가능한 시스템을 구축하고 유지 관리, 성능 최적화하는 것이 목표

⇒ MLOps 를 사용하자! 데이터 사이언티스트와 소프트웨어 엔지니어에게 협업 환경을 제공하여 실험 추적, 모델 관리 등 머신러닝의 수명 주기 및 운영을 간단하게 수행할 수 있게 해준다.


MLflow란?

참고: https://www.databricks.com/kr/product/managed-mlflow

source:&nbsp;https://www.databricks.com/blog/2020/04/15/databricks-extends-mlflow-model-registry-with-enterprise-features.html

  1. MLflow Tracking: 실험에서 사용된 데이터를 기록하고 조회할 수 있다. (UI 제공)
    • 저장 가능한 데이터: parameters, code version, metrics, model environments dependencies, model artifacts(ex, image, parquet files)
    • Tags: 실험에 임의의 tag를 달아 필터를 걸어 찾아볼 수 있다.
  2. MLflow Models: 다양한 ML 라이브러리로 훈련된 모델을 패키징하기 위한 표준 형식
    • Flavor: 모델 아티팩트를 저장하고 로드하기 위한 표준 형식⇒ 라이브러리에 관계없이 동일한 인터페이스를 통해서 모델 로드할 수 있다.
    • ex) “python_function” Flaver는 python 함수로 모델을 저장하고 로드할 때 사용됨
    • tensorflow와 pytorch 모델 coversion test를 했던 이전 블로그 글 (어려웠던 경험)
  3. MLflow Model Registry: 중앙 모델 저장소
    • 참고: versioning, stage transitions, annotations와 같은 metadata도 포함하여 저장
  4. MLflow Projects: 코드를 실행하는데 사용되는 Environment를 지정할 수 있다. (conda, docker 컨테이너 등)
  5. MLflow Recipes


MLflow 어떻게 사용할까?

MLFlow로 모델 Lifecycle 관리

아래 작성한 예시 Code (API vs MLflow) : https://github.com/jaxgxxnxee/Mlflow-test/tree/master

Docker Compose 튜토리얼


Docker Compose 튜토리얼

도커란 : 컨테이너를 쉽고 빠르게 배포/확장하고 관리를 자동화해주는 오픈소스 플랫폼 컨테이너: 컨테이너는 격리된 공간에서 프로세스가 동작하는 기술. VM과 유사하지만 격리 속성을 완화하

everyday-deeplearning.tistory.com


0. Install MLflow

$ pip instatll mlflow
$ mlflow server \
    --host 0.0.0.0 \
    --port 5000


1. 프로젝트 생성하기 (iris_model Folder)

프로젝트 환경 정의

: conda, pyenv, docker 가능


MLproject : 프로젝트 정의서

name: sklearn_iris_example

conda_env: conda.yaml

entry_points:
  main:
    parameters:
      random_state: {type: int, default: 0}  # 여기서 param을 조절하면서 테스트함
    command: "python iris_model.py {random_state}"


conda.yaml: conda환경을 사용하기 위해 miniconda 먼저 설치 해야함

name: sklearn_iris_example

channels:
  - defaults

dependencies:
  - python=3.7
  - numpy
  - pandas
  - scikit-learn
  - pip
  - pip:
    - mlflow

ref: https://conda.io/projects/conda/en/latest/user-guide/tasks/manage-environments.html#create-env-file-manually


모델 parmeter, metric 등 기록 대상 정의

iris_model.py

import mlflow
from mlflow.models.signature import infer_signature

from sklearn import datasets
from sklearn.model_selection import train_test_split
from sklearn.linear_model import LogisticRegression
from sklearn.metrics import accuracy_score, recall_score, precision_score, f1_score
import json
import sys

## Load Dataset
random_state = int(sys.argv[1]) if len(sys.argv) > 1 else 0
iris_data = datasets.load_iris()
target_index = {i: target for i, target in enumerate(iris_data['target_names'])}
X, y = iris_data.data, iris_data.target
X_train, X_test, y_train, y_test = train_test_split(X, y, test_size=0.2, random_state=random_state)

## Train Dataset
clf = LogisticRegression(max_iter=10000)  # api생성시는 문제가 없었지만, 여기서는 max_iter를 늘리지 않으면 에러가 남
clf.fit(X_train, y_train)
y_predict = clf.predict(X_test)

## Logging
mlflow.log_param("random_state", random_state)

mlflow.log_metric("ac_sc", accuracy_score(y_test, y_predict))
mlflow.log_metric("rc_sc", recall_score(y_test, y_predict, average="weighted"))
mlflow.log_metric("pr_sc", precision_score(y_test, y_predict, average="weighted"))
mlflow.log_metric("f1_sc", f1_score(y_test, y_predict, average='micro'))

signature = infer_signature(X_test, y_predict)  # 꼭 해야하는 것은 아닌듯?
mlflow.sklearn.log_model(clf, "iris_classification", signature=signature)

with open('../s3/target_index.json', 'w') as f:  # 실제 s3는 api_key, password 환경설정 해야함, 여기서는 local에서 접근할 수 있는 공유폴더에 저장함
    json.dump(target_index, f)


2. 모델 실행하기

$ mlflow run iris_model

** issue: sklearn package관련 data memory 에러가 있었다 → 한 번 더 실행하니 되더라 (깔끔한 방법 다시 찾아봐야할듯)

model folder tree

  • 참고: github에 올려둔 소스 바로 실행 가능하다고 함
    • $ mlflow run git@github.com:/{iris_model_path}.git


3. 훈련된 모델 Tracking하기

$ mlflow ui

UI


4. 모델 배포하기

$ mlflow models serve -m src/iris_model/mlruns/0/14b6f49e06ec4f029b87dbeeb7c36daf/artifacts/iris_classification -p 5001 -h 0.0.0.0  # host의 default는 127.0.0.1 이지만 다른 곳에서 접근하기 위해 0.0.0.0으로 변경함
  • default flavor: python_function


5. 모델 호출

  • **참고: pandas split을 꼭 사용해야 함
$ curl -X POST -H "Content-Type:application/json; format=pandas-split" --data '[{"columns": ["sepal length (cm)", "sepal width (cm)", "petal length (cm)", "petal width (cm)"], "data": [[5.1, 3.5, 1.4, 0.2]]}]' http://0.0.0.0:5002/invocations

result


Todo


활용 사례

MLflow를 이용한 머신러닝 프로젝트 관리. 박선준-PyCon Korea2021

반응형
반응형

Python을 더 잘 알고 더 잘 사용하기 위해 참고하면 좋은 자료 공유 및 약간의 정리를 해보았다!


실수하기 쉬운 Python 문법

출처: https://yozm.wishket.com/magazine/detail/1605/

  1. import * 사용함

    • 비효율적일 수 있다. 모듈에 object 가 많을 경우 모든 항목을 불러올 때까지 오랜시간 기다려야함
    • 변수명 충돌을 일으킬 수 있다.
  2. except 절 예외 지정 안함

    : SystemExit과 KeyboadInterrupt를 잡아서 Control-C로 프로그램 중지를 어렵게 함

  3. 수학계산에 numpy 사용 안함

    : numpy는 작업을 벡터화하기 때문에 더 빠름

  4. 이전에 열었던 파일을 닫지 않음 (비슷한 예로 db connect close하지 않음)

  5. PEP8 가이드라인을 벗어남

    https://peps.python.org/pep-0008/

    적절한 띄어쓰기, 이해하기 쉬운 변수명

     # Bad
     my_list = [1,2,3,4,5]
     my_dict = {'key1':'value1','key2':'value2'}
     x = 'Euni'
    
     # Good
     my_list = [1, 2, 3, 4, 5]
     my_dict = {'key1': 'value1', 'key2': 'value2'}
     my_name = 'Euni'
  6. 딕셔너리 사용시에 .keys와 .values를 적절하게 사용하지 않음

     # Bad - euni: ..? 왜 bad인지 모르겠...다...
     for key in my_dict.keys():
         print(key)
    
     # Good
     for key in my_dict:
         print(key)
    
     # Bad
     for key in my_dict:
         print(my_dict[key])
    
     # Good
     for key, value in my_dict.items():
         print(value)
  7. 컴프리헨션(comprehension)을 사용하지 않음 (혹은 언제나 사용)

    • 컴프리헨션: list, dict 등을 생성하는 경우 for 루프 대신 더 짧은 코드로 해결할 수 있게 도와줌
  8. range(len()) 사용

    → enumerate로 대신 사용할 수 있음

  9. + 연산자를 사용한 문자열 연결

    → f-string로 대신 사용할 수 있음

  10. mutable value를 디폴트 매개변수로 사용할 때

    # Bad
    def my_function(i, my_list=[]):
        my_list.append(i)
        return my_list
    
    # Good
    def my_function(i, my_list=None):
        if my_list is None:
            my_list =[]
        my_list.append(i)
        return my_list


type hints

출처: https://realpython.com/python-type-checking/

  1. Function Annotations

     ## format
     # def func(arg: arg_type, optarg: arg_type = default) -> return_type:
    
     # ex) without return type
     import tensorflow as tf
     import numpy as np
    
     def parse_fn(row: np.array):
         row = row.decode('utf-8')  # type: str
         [...]
         return x, y
    
     dataset = dataset.map(lambda x: tf.numpy_function(parse_fn, inp=[x],
                                           Tout=[tf.float32, tf.int64]
                                          ),
                           num_parallel_calls=tf.data.experimental.AUTOTUNE)
    
     # ex2) type 에러 발생하도록 하려면 assert 이용하기
     def test_fn(text: str, status: bool = True) -> str:
         assert (isinstance(text, str) and isinstance(status, bool)), 'TypeError')
         [..]
         return text
  2. Variable Annotations

     name: str = "Euni"
     pi: float = 3.142
     centered: bool = False
    
     names: list = ["Euni", "PePe", "SHS"]
     version: tuple = (3, 7, 1)
     options: dict = {"centered": False, "capitalize": True}
    • 다른 type으로 재할당도 에러 발생하지 않음
  3. Typing Module

     from typing import Dict, List, Tuple  # 내장함수
    
     names: List[str] = ["Euni", "PePe", "SHS"]
     version: Tuple[int, int, int] = (3, 7, 1)
     options: Dict[str, bool] = {"centered": False, "capitalize": True}
반응형
반응형

지난 포스팅에서 Flask 로 모델을 서빙해보며 간단하게 API 에 대해 알 수 있었다.

제목이 성공기인 이유.. 저번에 TorchServe, Docker 등 시도했지만 실패함 :(

이번 성공기를 기록하여 다른 사람들은 어려움에 겪지 않도록!!

https://everyday-deeplearning.tistory.com/entry/Pytorch-serving-with-Flask


Custom Pytorch Model serving with Flask

참고: https://tutorials.pytorch.kr/intermediate/flask_rest_api_tutorial.html 장점 데이터의 전, 후 처리를 할 수 있다. 쉽게 API를 사용할 수 있어 범용성이 좋다. Flask 아주 가벼운 웹프레임워크로 비교적..

everyday-deeplearning.tistory.com


[https://github.com/jeremiahschung/ghactions](https://github.com/jeremiahschung/ghactions)

https://github.com/jeremiahschung/ghactions


Custom Pytorch Model Serving!

1. train model # def Model(nn.Module)

model.py

## >> model.py
## custom model

import torch
import torch.nn as nn

class ClassificationModel(nn.Module):
        # euni: init params default 있어야 함
    def __init__(self, class_num=5, input_shape=(3, 224, 224), dim=128, rate=0.1):
        super(ClassificationModel, self).__init__()

        ## euni: padding='same'
        self.conv2d = nn.Conv2d(3, 2, kernel_size=(3, 3), stride=(1, 1), padding=(1, 1), bias=False)
        self.ReLU = nn.ReLU()

        self.flatten = nn.Flatten()

        self.linear1 = nn.Linear(input_shape[1] * input_shape[2] * 2, dim)
        self.dropout = nn.Dropout(p=rate, inplace=False)

        self.linear2 = nn.Linear(dim, class_num)

    def forward(self, inputs, training=False):  # 맞는지 모르겠음

        embedding = self.conv2d(inputs)
        embedding = self.ReLU(embedding)

        embedding = self.flatten(embedding)

        embedding = self.linear1(embedding)
        embedding = self.ReLU(embedding)
        embedding = self.dropout(embedding)

        embedding = self.linear2(embedding)

        return embedding

# class_num = 5
# input_shape = (3, 224, 224)
# classification_model = ClassificationModel(class_num=class_num, input_shape=input_shape, rate=0.2)

## train했다고 가정
# classification_model

2. state_dict

# torch.save(model.state_dict(), "custom_model.pt")

## train 후 저장
torch.save(classification_model.state_dict(), 'classification_model.pt')

3. custom handler (input image preprocessing & model inference postprocess)

https://github.com/pytorch/serve/tree/master/examples/image_classifier/mnist

handler.py

# >> handler.py
from torchvision import transforms
from ts.torch_handler.image_classifier import ImageClassifier
from torch.profiler import ProfilerActivity

class BinaryClassifier(ImageClassifier):
    """
    MNISTDigitClassifier handler class. This handler extends class ImageClassifier from image_classifier.py, a
    default handler. This handler takes an image and returns the number in that image.
    Here method postprocess() has been overridden while others are reused from parent class.
    """

    # euni: preprocessing
    image_processing = transforms.Compose([
        transforms.Resize((224,224)),
        transforms.ToTensor(),
    ])

    def __init__(self):
        super(BinaryClassifier, self).__init__()
        self.profiler_args = {
            "activities" : [ProfilerActivity.CPU],
            "record_shapes": True,
        }

    def postprocess(self, data):
        """The post process of MNIST converts the predicted output response to a label.
        Args:
            data (list): The predicted output from the Inference with probabilities is passed
            to the post-process function
        Returns:
            list : A list of dictionaries with predictions and explanations is returned
        """
        return data.argmax(1).tolist()

4. torch-model-archiver -> .mar file

$ git clone https://github.com/pytorch/serve.git
$ cd serve  # 이동해서 해야함
$ python ./ts_scripts/install_dependencies.py  # requirements..(cpu version)
$ cd ..

$ pip install torchserve torch-model-archiver torch-workflow-archiver
$ mkdir model_store  # .mar file 위치
$ torch-model-archiver --model-name binary_classification --version 1.0 --model-file model.py --serialized-file classification_model.pt --export-path model_store --handler handler.py

5. torchserve --start ...

$ torchserve --start --model-store model_store --models binary_classification.mar

6. inference test

$ curl http://127.0.0.1:8080/predictions/binary_classification -T  tmp.jpg
# $ torchserve --stop


[issue 503]

{
  "code": 503,
  "type": "InternalServerException",
  "message": "Prediction failed"
}


→ solution


1. model or handler code issue check!


2. 같은 Port가 쓰이고 있을 수 있음 → port 변경

https://github.com/pytorch/serve/blob/master/docs/configuration.md#other-properties

$ grep 8080 /etc/services
  1. Create/update config.properties file
enable_envvars_config=true
inference_address=http://127.0.0.1:8443
management_address=http://127.0.0.1:8444
metrics_address=http://127.0.0.1:8445
  1. restart serve
torchserve --start --model-store model_store --models binary_classification=binary_classification.mar --ts-config config.properties
  1. inference test
$ curl http://127.0.0.1:8443/predictions/binary_classification -T  tmp.jpg


반응형

+ Recent posts