반응형

Python을 더 잘 알고 더 잘 사용하기 위해 참고하면 좋은 자료 공유 및 약간의 정리를 해보았다!


실수하기 쉬운 Python 문법

출처: https://yozm.wishket.com/magazine/detail/1605/

  1. import * 사용함

    • 비효율적일 수 있다. 모듈에 object 가 많을 경우 모든 항목을 불러올 때까지 오랜시간 기다려야함
    • 변수명 충돌을 일으킬 수 있다.
  2. except 절 예외 지정 안함

    : SystemExit과 KeyboadInterrupt를 잡아서 Control-C로 프로그램 중지를 어렵게 함

  3. 수학계산에 numpy 사용 안함

    : numpy는 작업을 벡터화하기 때문에 더 빠름

  4. 이전에 열었던 파일을 닫지 않음 (비슷한 예로 db connect close하지 않음)

  5. PEP8 가이드라인을 벗어남

    https://peps.python.org/pep-0008/

    적절한 띄어쓰기, 이해하기 쉬운 변수명

     # Bad
     my_list = [1,2,3,4,5]
     my_dict = {'key1':'value1','key2':'value2'}
     x = 'Euni'
    
     # Good
     my_list = [1, 2, 3, 4, 5]
     my_dict = {'key1': 'value1', 'key2': 'value2'}
     my_name = 'Euni'
  6. 딕셔너리 사용시에 .keys와 .values를 적절하게 사용하지 않음

     # Bad - euni: ..? 왜 bad인지 모르겠...다...
     for key in my_dict.keys():
         print(key)
    
     # Good
     for key in my_dict:
         print(key)
    
     # Bad
     for key in my_dict:
         print(my_dict[key])
    
     # Good
     for key, value in my_dict.items():
         print(value)
  7. 컴프리헨션(comprehension)을 사용하지 않음 (혹은 언제나 사용)

    • 컴프리헨션: list, dict 등을 생성하는 경우 for 루프 대신 더 짧은 코드로 해결할 수 있게 도와줌
  8. range(len()) 사용

    → enumerate로 대신 사용할 수 있음

  9. + 연산자를 사용한 문자열 연결

    → f-string로 대신 사용할 수 있음

  10. mutable value를 디폴트 매개변수로 사용할 때

    # Bad
    def my_function(i, my_list=[]):
        my_list.append(i)
        return my_list
    
    # Good
    def my_function(i, my_list=None):
        if my_list is None:
            my_list =[]
        my_list.append(i)
        return my_list


type hints

출처: https://realpython.com/python-type-checking/

  1. Function Annotations

     ## format
     # def func(arg: arg_type, optarg: arg_type = default) -> return_type:
    
     # ex) without return type
     import tensorflow as tf
     import numpy as np
    
     def parse_fn(row: np.array):
         row = row.decode('utf-8')  # type: str
         [...]
         return x, y
    
     dataset = dataset.map(lambda x: tf.numpy_function(parse_fn, inp=[x],
                                           Tout=[tf.float32, tf.int64]
                                          ),
                           num_parallel_calls=tf.data.experimental.AUTOTUNE)
    
     # ex2) type 에러 발생하도록 하려면 assert 이용하기
     def test_fn(text: str, status: bool = True) -> str:
         assert (isinstance(text, str) and isinstance(status, bool)), 'TypeError')
         [..]
         return text
  2. Variable Annotations

     name: str = "Euni"
     pi: float = 3.142
     centered: bool = False
    
     names: list = ["Euni", "PePe", "SHS"]
     version: tuple = (3, 7, 1)
     options: dict = {"centered": False, "capitalize": True}
    • 다른 type으로 재할당도 에러 발생하지 않음
  3. Typing Module

     from typing import Dict, List, Tuple  # 내장함수
    
     names: List[str] = ["Euni", "PePe", "SHS"]
     version: Tuple[int, int, int] = (3, 7, 1)
     options: Dict[str, bool] = {"centered": False, "capitalize": True}
반응형
반응형
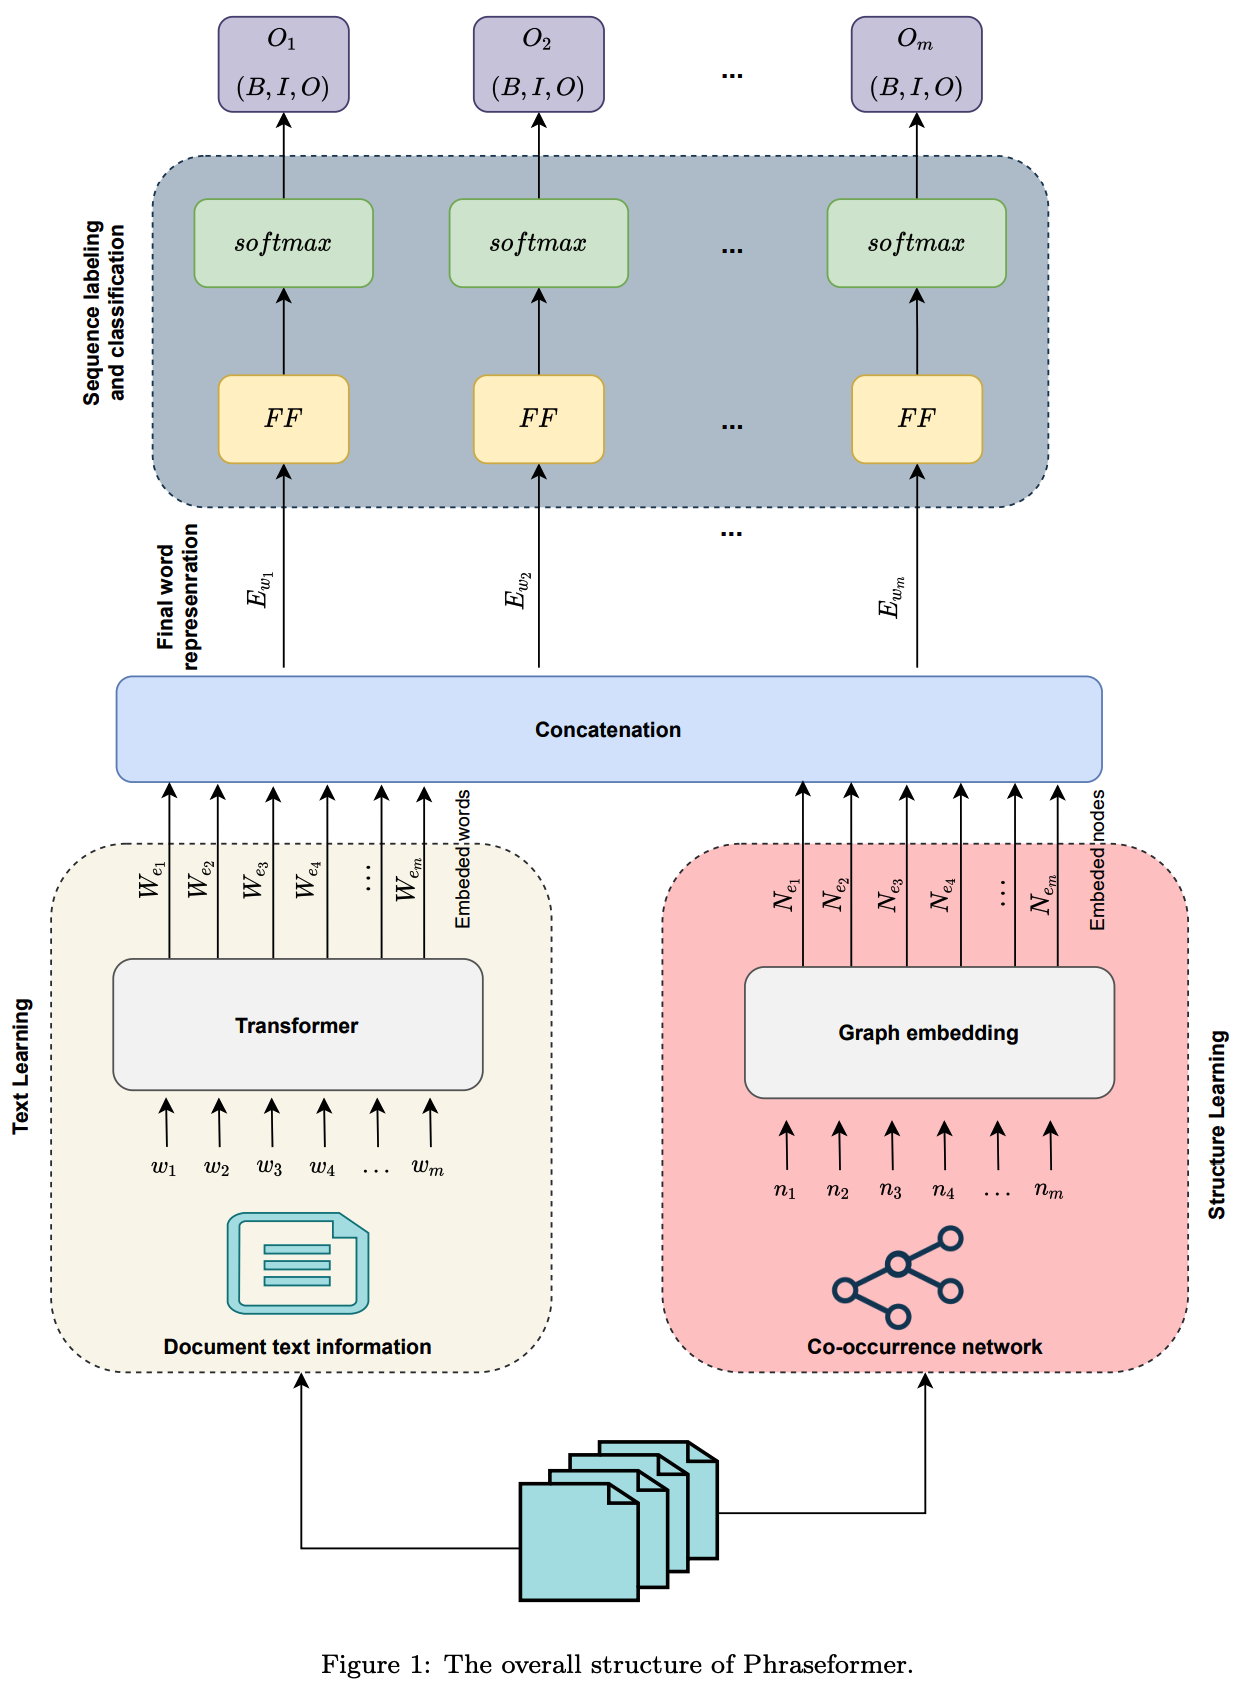
Keywords: Multimodal representation learning, Keyword extraction, Transformer, Graph embedding, (Key-phrase extraction)
Models: Bert(Transformer) & ExEm(Graph Embedding) → Random Forest Metric: F1-score


의견

논리적으로 좋은 아이디어인듯!

  • text embedding, node(structure) embedding 두 모델의 앙상블
  • random forest로 BIO tagging classification (with f-1 score)

단,

  • code가 없어 당장 써보기 어려움 (ExEm 대신 node2vec 사용해봐도 될듯)
  • 다만, 우선 구조적으로 graphical dataset을 만들어?찾아?야하지 않나? and 우리의 데이터셋은 structure(relationship)를 배울 필요성이 있나? 고민해보기

Graphs Neural Networks in NLP

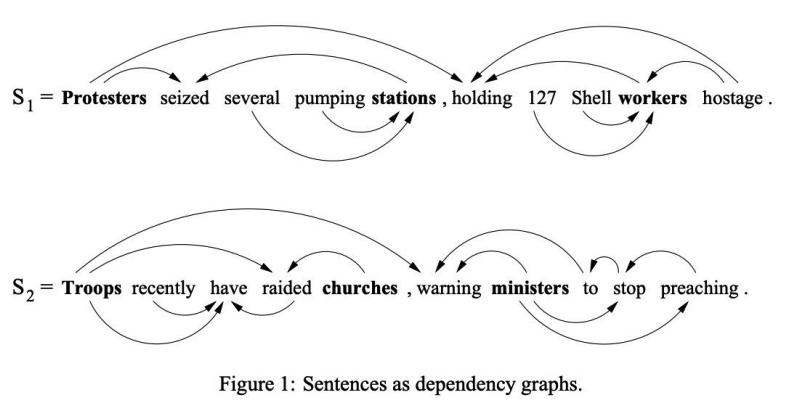
“Its size is ideal and the weight is acceptable.”
 Attention-based models often identify acceptable as a descriptor of the aspect size, which is in fact not the case.

→ sentences as dependency graphs로?→ 생성을 어떻게 하지? → en의 경우 parser 있음

* graphs neural net의 장점: un( or semi)supervised learning, unkown relation(edge) embedding 가능


⇒ 사용할만한 keyphrase idea: BERT-RandomForest(BIO tagging)


Abstract

1. Background

Keywords are terms that describe the most relevant information in a document.

However, previous keyword extraction approaches have utilized the text and graph features, there is the lack of models that can properly learn and combine these features in a best way.


2. Methods

In Phraseformer, each keyword candidate is presented by a vector which is the concatenation of the text and structure learning representations.

Phraseformer takes the advantages of recent researches such as BERT(Sentence Embedding) and ExEm(Graph Embedding) to preserve both representations.

Also, the Phraseformer treats the key-phrase extraction task as a sequence labeling problem solved using classification task.


3. Results

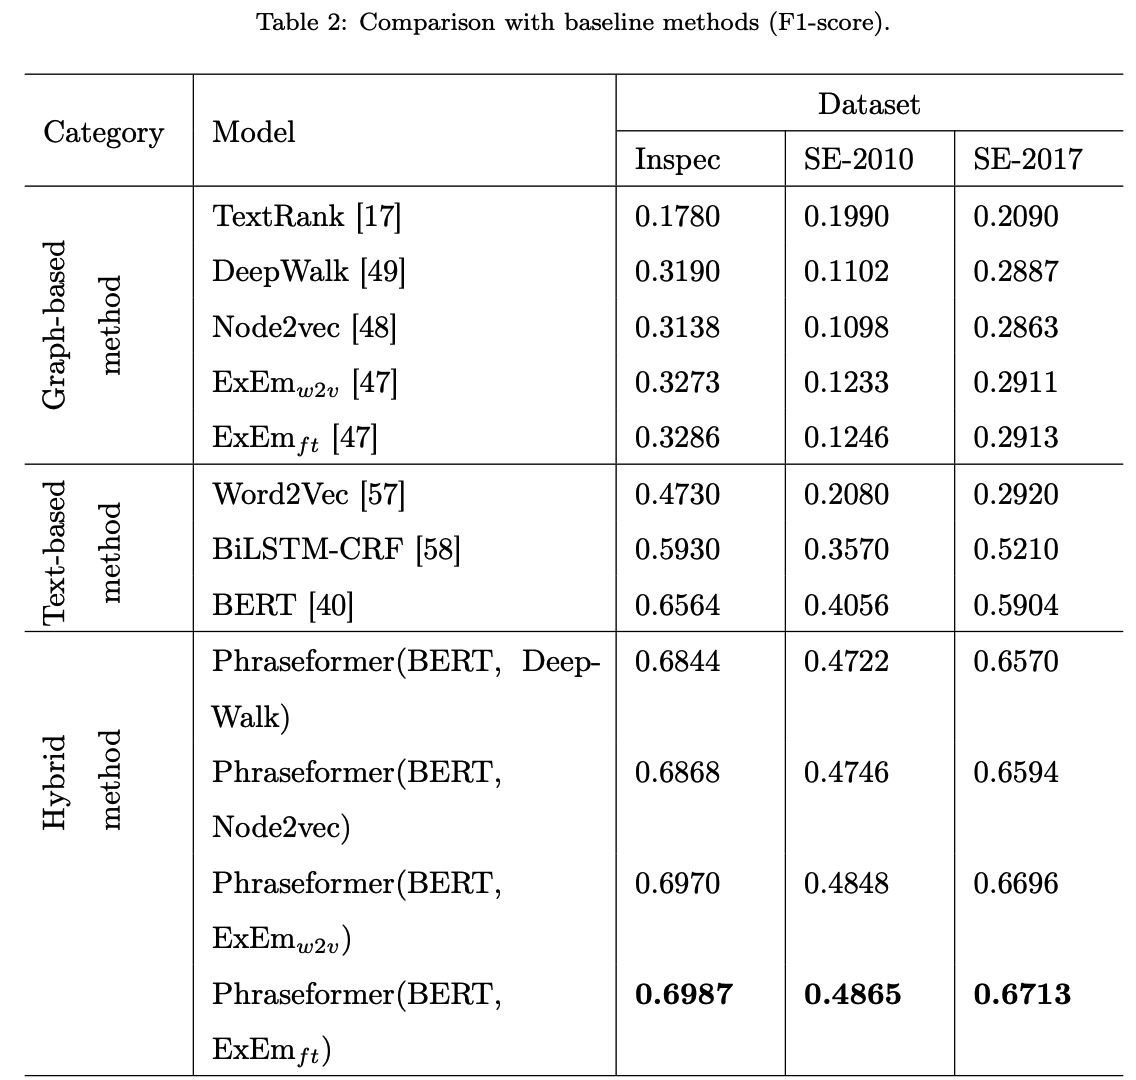
F1-score, three datasets(Inspec dataset, ..) used

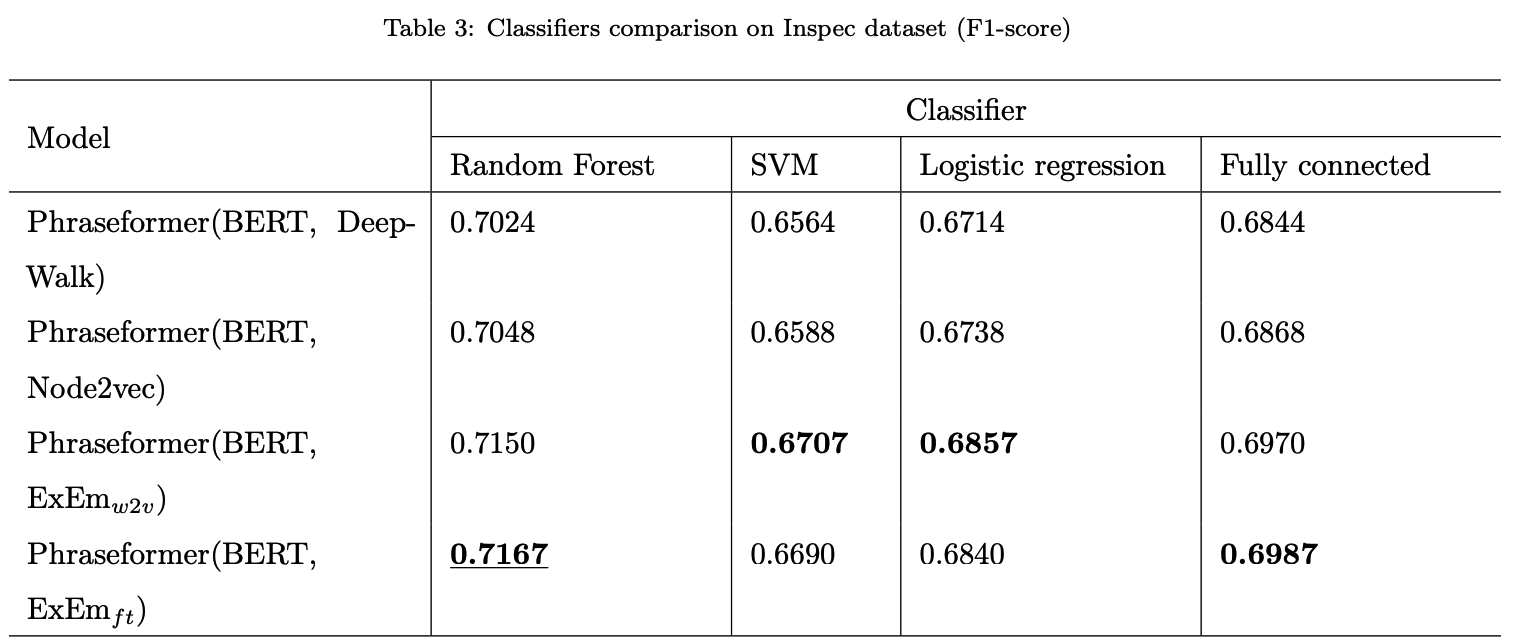
Additionally, the Random Forest classifier gain the highest F1-score among all classifiers.


4. Conclusions

Due to the fact that the combination of BERT and ExEm is more meaningful and can better represent the semantic of words.


Experimental Evaluation & Results

1. Dataset

Inspec includes abstracts of papers from Computer Science collected between the years 1998 and 2002. SE-2010 contains of full scientific articles that are obtained from the ACM Digital Library. In our experiment, we used the abstract of papers. SE-2017 consists of paragraphs selected from 500 ScienceDirect journal papers from Computer Science, Material Sciences and Physics domains.

*Gold keys: the ground-truth keywords


2. Metrics

$\text{F1-score} = 2 \times \frac{\frac{Y\cap Y'}{Y'}\times \frac{Y\cap Y'}{Y}}{\frac{Y\cap Y'}{Y'} + \frac{Y\cap Y'}{Y}} = 2\times \frac{\text{precision}\times\text{recall}}{\text{precision}+\text{recall}}$

$\text{precision} = \frac{\text{number of correctly matched}}{\text{total number of extracted}} = \frac{TP}{TP+FP}$

$\text{recall} = \frac{\text{number of correctly matched}}{\text{total number of assigned}} = \frac{TP}{TP+FN}$


3. Baseline models

Node2vec [48] is modified version of DeepWalk that uses a biased random walks to convert nodes into vectors.

  1. We propose node2vec, an efficient scalable algorithm for feature learning in networks that efficiently optimizes a novel network-aware, neighborhood preserving objective using SGD.
  2. We extend node2vec and other feature learning methods based on neighborhood preserving objectives, from nodes to pairs of nodes for edge-based prediction tasks.


ExEm [47] is a random walk based approach that uses dominating set theory to generate random walks.

  • A novel graph embedding using dominating-set theory and deep learning is proposed.
  • $ExEm_{ft}$ : It is a version of ExEm that engages fastText method to learn the node representation.
  • $ExEm_{w2v}$: This one is another form of ExEm that allows to create node representations by using Word2vec approach.


BERT [40] is a textual approach that uses the transformer structure to obtain the document representation.


4. Classifier (BIO tagging)

In this part of our experiment we aim to investigate which classifier is best suited for sequence labelling and classification tasks to find key-phrases.


반응형
반응형

지난 포스팅에서 Flask 로 모델을 서빙해보며 간단하게 API 에 대해 알 수 있었다.

제목이 성공기인 이유.. 저번에 TorchServe, Docker 등 시도했지만 실패함 :(

이번 성공기를 기록하여 다른 사람들은 어려움에 겪지 않도록!!

https://everyday-deeplearning.tistory.com/entry/Pytorch-serving-with-Flask


Custom Pytorch Model serving with Flask

참고: https://tutorials.pytorch.kr/intermediate/flask_rest_api_tutorial.html 장점 데이터의 전, 후 처리를 할 수 있다. 쉽게 API를 사용할 수 있어 범용성이 좋다. Flask 아주 가벼운 웹프레임워크로 비교적..

everyday-deeplearning.tistory.com


[https://github.com/jeremiahschung/ghactions](https://github.com/jeremiahschung/ghactions)

https://github.com/jeremiahschung/ghactions


Custom Pytorch Model Serving!

1. train model # def Model(nn.Module)

model.py

## >> model.py
## custom model

import torch
import torch.nn as nn

class ClassificationModel(nn.Module):
        # euni: init params default 있어야 함
    def __init__(self, class_num=5, input_shape=(3, 224, 224), dim=128, rate=0.1):
        super(ClassificationModel, self).__init__()

        ## euni: padding='same'
        self.conv2d = nn.Conv2d(3, 2, kernel_size=(3, 3), stride=(1, 1), padding=(1, 1), bias=False)
        self.ReLU = nn.ReLU()

        self.flatten = nn.Flatten()

        self.linear1 = nn.Linear(input_shape[1] * input_shape[2] * 2, dim)
        self.dropout = nn.Dropout(p=rate, inplace=False)

        self.linear2 = nn.Linear(dim, class_num)

    def forward(self, inputs, training=False):  # 맞는지 모르겠음

        embedding = self.conv2d(inputs)
        embedding = self.ReLU(embedding)

        embedding = self.flatten(embedding)

        embedding = self.linear1(embedding)
        embedding = self.ReLU(embedding)
        embedding = self.dropout(embedding)

        embedding = self.linear2(embedding)

        return embedding

# class_num = 5
# input_shape = (3, 224, 224)
# classification_model = ClassificationModel(class_num=class_num, input_shape=input_shape, rate=0.2)

## train했다고 가정
# classification_model

2. state_dict

# torch.save(model.state_dict(), "custom_model.pt")

## train 후 저장
torch.save(classification_model.state_dict(), 'classification_model.pt')

3. custom handler (input image preprocessing & model inference postprocess)

https://github.com/pytorch/serve/tree/master/examples/image_classifier/mnist

handler.py

# >> handler.py
from torchvision import transforms
from ts.torch_handler.image_classifier import ImageClassifier
from torch.profiler import ProfilerActivity

class BinaryClassifier(ImageClassifier):
    """
    MNISTDigitClassifier handler class. This handler extends class ImageClassifier from image_classifier.py, a
    default handler. This handler takes an image and returns the number in that image.
    Here method postprocess() has been overridden while others are reused from parent class.
    """

    # euni: preprocessing
    image_processing = transforms.Compose([
        transforms.Resize((224,224)),
        transforms.ToTensor(),
    ])

    def __init__(self):
        super(BinaryClassifier, self).__init__()
        self.profiler_args = {
            "activities" : [ProfilerActivity.CPU],
            "record_shapes": True,
        }

    def postprocess(self, data):
        """The post process of MNIST converts the predicted output response to a label.
        Args:
            data (list): The predicted output from the Inference with probabilities is passed
            to the post-process function
        Returns:
            list : A list of dictionaries with predictions and explanations is returned
        """
        return data.argmax(1).tolist()

4. torch-model-archiver -> .mar file

$ git clone https://github.com/pytorch/serve.git
$ cd serve  # 이동해서 해야함
$ python ./ts_scripts/install_dependencies.py  # requirements..(cpu version)
$ cd ..

$ pip install torchserve torch-model-archiver torch-workflow-archiver
$ mkdir model_store  # .mar file 위치
$ torch-model-archiver --model-name binary_classification --version 1.0 --model-file model.py --serialized-file classification_model.pt --export-path model_store --handler handler.py

5. torchserve --start ...

$ torchserve --start --model-store model_store --models binary_classification.mar

6. inference test

$ curl http://127.0.0.1:8080/predictions/binary_classification -T  tmp.jpg
# $ torchserve --stop


[issue 503]

{
  "code": 503,
  "type": "InternalServerException",
  "message": "Prediction failed"
}


→ solution


1. model or handler code issue check!


2. 같은 Port가 쓰이고 있을 수 있음 → port 변경

https://github.com/pytorch/serve/blob/master/docs/configuration.md#other-properties

$ grep 8080 /etc/services
  1. Create/update config.properties file
enable_envvars_config=true
inference_address=http://127.0.0.1:8443
management_address=http://127.0.0.1:8444
metrics_address=http://127.0.0.1:8445
  1. restart serve
torchserve --start --model-store model_store --models binary_classification=binary_classification.mar --ts-config config.properties
  1. inference test
$ curl http://127.0.0.1:8443/predictions/binary_classification -T  tmp.jpg


반응형
반응형

Test 의견

: 완벽 호환 안될 수 있음. custom model이라면 이슈를 미리 고려해서 모델 생성 후 적용해야할듯

TensorFlow 2 PyTorch

  1. 환경설정

     $ pip install tensorflow
     $ conda install pytorch torchvision cpuonly -c pytorch
    
     $ conda install -c conda-forge onnx
     $ pip install tf2onnx
     $ pip install onnx2pytorch
  2. TF Model 생성 !!주의!! GlobalAveragePooling2D, GlobalMaxPooling2D 등 pytorch에 없는 layer는… 에러 남!

     import tensorflow as tf
     class_num = 5
    
     class ClassificationModel(tf.keras.Model):
         def __init__(self, class_num, dim=128, rate=0.1):
             super(ClassificationModel, self).__init__()
             self.conv2d = tf.keras.layers.Conv2D(2, 3, padding='same', activation='relu')
    
             self.dense1 = tf.keras.layers.Dense(dim, activation='relu')
             self.dense2 = tf.keras.layers.Dense(class_num, activation='softmax', name='output')
    
             self.flatten = tf.keras.layers.Flatten()
             self.dropout = tf.keras.layers.Dropout(rate)
    
         def call(self, inputs):
    
             embedding = self.conv2d(inputs)
    
             embedding = self.flatten(embedding)
    
             embedding = self.dense1(embedding)
             embedding = self.dropout(embedding)
    
             embedding = self.dense2(embedding)
    
             return embedding
    
     input_shape = (224, 224, 3)
     classification_model = ClassificationModel(class_num=class_num, rate=0.2)
    
     ## sample test
     temp_input = tf.random.uniform(input_shape, dtype=tf.float32, minval=0, maxval=256)
     output = classification_model(tf.expand_dims(temp_input, 0))
    
     output.shape # TensorShape([1, 5])
    
     # model architecture & params 확인
     classification_model.build((None, 224, 224, 3))
     classification_model.summary()
    
     classification_model.compile(optimizer='adam',
                              loss=tf.keras.losses.CategoricalCrossentropy(from_logits=False),
                              metrics=['categorical_accuracy'])
    
     ## !! 사실은 train 해야함 !!
    
     model_save_path = 'image_classification_model'
     tf.keras.models.save_model(classification_model, model_save_path, include_optimizer=False)
  3. tf2onnx

     $ python -m tf2onnx.convert --saved-model image_classification_model --output image_classification_model.onnx
  4. ONNX inference Test

     import numpy as np
     import onnxruntime as ort
    
     img_path = 'tmp224.npy'
     img = np.load(img_path)  # input shape와 맞춰서 저장해놓음
     img = (img/255.0).astype('float32')  # input scale
     img = np.expand_dims(img, 0)
    
     sess_ort = ort.InferenceSession('image_classification_model.onnx')
    
     res = sess_ort.run(None, input_feed={sess_ort.get_inputs()[0].name: img})
    
     ## res
     # [array([[0.24008103, 0.19883673, 0.1655813 , 0.20317516, 0.19232577]],
     #       dtype=float32)]
  5. onnx2pytorch

     import onnx
     from onnx2pytorch import ConvertModel
    
     onnx_model = onnx.load('image_classification_model.onnx')
     pytorch_model = ConvertModel(onnx_model)
     pytorch_model
    
     # ConvertModel(
     #   (Transpose_StatefulPartitionedCall/classification_model_2/conv2d_3/Conv2D__6:0): Transpose()
     #   (Conv_StatefulPartitionedCall/classification_model_2/conv2d_3/Conv2D:0): Conv2d(3, 2, kernel_size=(3, 3), stride=(1, 1), padding=(1, 1), bias=False)
     #   (Relu_StatefulPartitionedCall/classification_model_2/conv2d_3/Relu:0): ReLU(inplace=True)
     #   (Transpose_StatefulPartitionedCall/classification_model_2/conv2d_3/Conv2D__8:0): Transpose()
     #   (Reshape_StatefulPartitionedCall/classification_model_2/flatten_1/Reshape:0): Reshape(shape=[    -1 100352])
     #   (MatMul_StatefulPartitionedCall/classification_model_2/dense_3/MatMul:0): Linear(in_features=100352, out_features=128, bias=False)
     #   (Relu_StatefulPartitionedCall/classification_model_2/dense_3/Relu:0): ReLU(inplace=True)
     #   (MatMul_StatefulPartitionedCall/classification_model_2/output/MatMul:0): Linear(in_features=128, out_features=5, bias=False)
     #   (Softmax_output_1): Softmax(dim=-1)
     # )
     import torch
     torch.save(pytorch_model, 'image_classification_model.pth')
  6. pytorch inference test

    : 결과 같은지 체크

     pytorch_model = torch.load('image_classification_model.pth')
     res = pytorch_model(torch.Tensor(img)) # dummy_input.reshape(1, 224,224, 3))
    
     ## res
     # tensor([[0.2401, 0.1988, 0.1656, 0.2032, 0.1923]], grad_fn=<SoftmaxBackward0>)
반응형

+ Recent posts